Sheng-Chieh Lin and Jimmy Lin - Densifying Sparse Representations for Passage Retrieval by Representational Slicing (arXiv 2021)
#DSRs #解説
Densify Sparse Representations
Sheng-Chieh Lin, Jimmy Lin - Densifying Sparse Representations for Passage Retrieval by Representational Slicing (2020) [arXiv]
Learned sparse and dense representations capture different successful approaches to text retrieval and the fusion of their results has proven to be more effective and robust. Prior work combines dense and sparse retrievers by fusing their model scores. As an alternative, this paper presents a simple approach to densifying sparse representations for text retrieval that does not involve any training. Our densified sparse representations (DSRs) are interpretable and can be easily combined with dense representations for end-to-end retrieval. We demonstrate that our approach can jointly learn sparse and dense representations within a single model and then combine them for dense retrieval. Experimental results suggest that combining our DSRs and dense representations yields a balanced tradeoff between effectiveness and efficiency.
TL;DR
- https://github.com/smiyawaki0820/aio2-tfidf-baseline/tree/main/densifiers
- NOTE: 上記のコードは著者らによる実装ではないため、誤っている場合があるかもしれません。
どんなもの?
- スライシングによって疎表現(TF-IDF や SPLADE)を高密度化するアプローチを提案。
- 学習は不要で、クエリと文書間の関連度を計算するためにゲート内積 (GIP) 演算を提案。
- DSR と他の密表現を組み合わせることも可能。
先行研究と比べてどこがすごい?
- TF-IDF などは、特に大規模な文書に適用すると vocabulary size が大きくなるため計算量が大きい。また contextualized sparse representations (UniCOIL や SPLADE など) は、言語モデルの語彙数に等しい。
技術や手法のキモはどこ?
- TF-IDF など
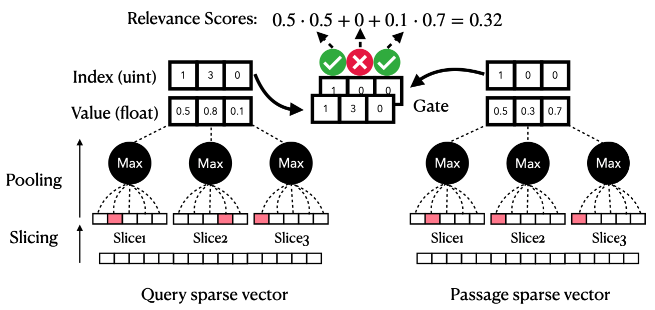
語彙数 == 次元数の場合に適用可能 - 疎なベクトル表現はスライス毎に分割しても、スライス内に大きな値を持つ語彙が数個しか存在しないためスライス毎に max pooling を適用することで次元数を削減
- クエリと文書の対応するスライス間で語彙数が一致する場合に内積を計算する Gated Inner Product (GIP) を提案
- さらに計算量を減らすため、retrieval-rerank の二段階で検索対象を限定する。retrieval では各スライスに対して閾値の通過を判定することで、値が低い(情報量が低い)単語を内積計算の対象から除外する。
どうやって有効だと検証した?

議論はある?
- メモリ効率が大幅に減少できるのは良い
- スライス毎に一つの注目単語(TF-IDF など値が高くなる場合)は効果が期待できるが、スライス内に注目単語が二つ以上存在する場合は max pooling によりどちらか一つが選択されてしまう
- 逆に TF-IDF でノイズとなりうる false negative 単語については計算対象から除外される可能性がある
- スライスの方法は複数考えられるため、語彙毎の出現頻度の重みなどを使用すればより良いスライス方法が考えられるかもしれない
次に読むべき論文は?
- Dai+'20 - Context-Aware Sentence/Passage Term Importance Estimation For First Stage Retrieval [arXiv][GitHub]
- Mallia+'21 - Learning Passage Impacts for Inverted Indexes (SIGIR) [arXiv][GitHub]
- Lin+'21 - A Few Brief Notes on DeepImpact, COIL, and a Conceptual Framework for Information Retrieval Techniques [arXiv]
- Formal+'21 - SPLADE: Sparse Lexical and Expansion Model for First Stage Ranking (SIGIR) [arXiv][GitHub]
- Formal+'21 - SPLADE v2: Sparse Lexical and Expansion Model for Information Retrieval [arXiv]
ParlAI の dictionary (vocabulary) について

本ページでは、ParlAI の dictionary について簡単に説明する。 実際に新たなタスクを定義する場合は、本ページの記述内容では不十分であるためドキュメントやソースコードを参照されたい。
また ParlAI に関連する記事については以下を参照されたい。
- ParlAI を理解した気持ちになる
- [ParlAI の World について (TBA)]
- ParlAI の TeacherAgent について
- [ParlAI の StudentAgent について (TBA)]
- ParlAI の dictionary (vocabulary) について
- [ParlAI を用いたモデルの学習について (TBA)]
- [ParlAI を用いたモデルのデプロイについて (TBA)]
目次
関連スクリプトのディレクトリ構造
2022.03.01 現在
- ParlAI/parlai/:
  # ParlAI のインターフェイスに基づく様々な agent 関連
  - agents/:
    - hugging_face/:
      - dict.py: huggingface を用いた DictionaryAgent が定義されたスクリプト

  #
  - core/:
    - agent.py: 基底クラスである Agent が定義されたスクリプト
    - dict.py: DictionaryAgent が定義されたスクリプト
    - params.py:

  # parlai CLI 関連
  - scripts/:
    - build_dict.py:      dictionary ファイル構築スクリプト
    - train_model.py:  モデル学習スクリプト

  # TeacherAgent (dataloader) 関連(image_chat を例にする)
  - tasks/:
    - task_list.py:         各タスクの情報が記載されたスクリプト
    - image_chat/:
      - agents.py:         TeacherAgent が定義されたスクリプト
      - build.py:            データセットのダウンロードを行うスクリプト
dictionary ファイルについて
dictionary (vocabulary) ファイルは以下の構成で作成されており、1列目はトークン、2列目は一般的にトークンの出現頻度が記載される(作成時の実行内容に依存する)。
[token: str] [frequency: int]
具体的には、以下のようなファイルが作成される。
__null__        1000000003
__start__       1000000002
__end__ 1000000001
__unk__ 1000000000
.       369072
I       196501
,       164482
the     159428
a       142721
dictionary ファイルの作成
ParlAI では、以下のコマンドを使用することで dictionary ファイルを作成することができる。
なお ParlAI では、setup.py 内で setuptools.setup の entry_points に "console_scripts": ["parlai=parlai.__main__:main"] と記載されているが、ここではどこのファイルに記述されているか分かりやすいように parlai の CLI の形で記述しないこととする。
コマンドライン引数の詳細については、以下を参照されたい。
Advanced Scripts — ParlAI Documentation
# 以下は同義
# parlai build_dict --task convai2 --dict-file premade.dict
$ python parlai/scripts/build_dict.py --task convai2 --dict-file premade.dict
また、以下の訓練スクリプトを実行する場合も同様に dictionary が作成される。
$ python parlai/scripts/train_model.py --task squad --dict-file premade.dict --model seq2seq
この場合、parlai/scripts/train_model.py の TrainLoop.__init__() で、以下のような処理が行われており、内部で build_dict が実行される。
# parlai/scripts/train_model.py
from parlai.scripts.build_dict import build_dict

class TrainLoop:

    def __init__(self, opt):
        # 一部省略

        if not (opt.get('dict_file') or opt.get('model_file')):
            raise RuntimeError(
                'WARNING: For train_model, please specify either a '
                'model_file or dict_file.'
            )
        if 'dict_file' in opt:
            if opt['dict_file'] is None and opt.get('model_file'):
                opt['dict_file'] = opt['model_file'] + '.dict'
            build_dict(opt, skip_if_built=True)
build_dict
parlai/scripts/build_dict.py では、内部で build_dict 関数が呼び出され、DictionaryAgent と TeacherAgent (DataLoader) 間でデータを受け取り、dictionary に登録するというやりとりが行われる。
# parlai/scripts/build_dict.py
from parlai.core.dict import DictionaryAgent
from parlai.core.params import str2class

def build_dict(opt, skip_if_built=False):
    # 一部省略

    # DictionaryAgent の定義
    if opt.get('dict_class'):
        dictionary = str2class(opt['dict_class'])(opt)  # カスタムする場合
    else:
        dictionary = DictionaryAgent(opt)

    # dictionary ファイルの作成
    datatypes = ['train:ordered:stream']
    if opt.get('dict_include_valid'):
        datatypes.append('valid:stream')
    if opt.get('dict_include_test'):
        datatypes.append('test:stream')
    for dt in datatypes:
        # TeacherAgent とのやりとり
        world_dict = create_task(ordered_opt, dictionary)
        while not world_dict.epoch_done():
            world_dict.parley()

    # dictionary の保存
    dictionary.save(opt['dict_file'], sort=True)
    return dictionary
DictionaryAgent について
DictionaryAgent では、dictionary のビルドやロードを行う。
特に、nltk_tokenize や space_tokenize などのトークナイズに関するメソッドや、txt2vec や vec2txt のように encode/decode を行うメソッドなどが定義されている。
また、TeacherAgent (DataLoader) 間でのやりとりは、act メソッドを用いる。
# parlai/core/dict.py

class DictionaryAgent(Agent):
    # 一部省略

    def __init__(self, opt: Opt, shared=None):
        self.freq = defaultdict(int)
        self.tok2ind = {}   # token -> index
        self.ind2tok = {}   # index -> token

    def act(self):
        for textfield in self.textfields:
            source: List[str] = self.observation.get(textfield)  # TeacherAgent から受け取り
            for text in source:
                self.add_to_dict(self.tokenize(text))

    def add_to_dict(self, tokens):
        for token in tokens:
            self.add_token(token)
            self.freq[token] += 1

    def add_token(self, word):
        if word not in self.tok2ind:
            index = len(self.tok2ind)
            self.tok2ind[word] = index
            self.ind2tok[index] = word
DictionaryAgent をカスタマイズする場合
実行処理の流れ
(再掲) build_dict 関数内では、以下の判定を行う。
# parlai/scripts/build_dict.py
from parlai.core.dict import DictionaryAgent
from parlai.core.params import str2class

def build_dict(opt, skip_if_built=False):
    if opt.get('dict_class'):
        dictionary = str2class(opt['dict_class'])(opt)  # カスタムする場合
    else:
        dictionary = DictionaryAgent(opt)
# parlai/core/params.py
import importlib

def str2class(value):
    name = value.split(':')
    module = importlib.import_module(name[0])
    return getattr(module, name[1])
すなわち、parlai/scripts/build_dict.py および parlai/scripts/train_model.py を実行する際には --dict-class を [module_path]:[class] のように指定する。ここでは例として、parlai/agents/hugging_face/dict.py に作成した JapaneseDictionaryAgent を呼び出すことを想定する。
# 以下は ImageChat の辞書を作成する場合の実行サンプル
python parlai/scripts/build_dict.py \
    --task image_chat:Generation \
    --dict-file dictionaries/image_chat.dict \
    --dict-class parlai.agents.hugging_face.dict:JapaneseDictionaryAgent
新たな Agent の作成
huggingface の BertJapaneseTokenizer の使用を想定して JapaneseDictionaryAgent を作成する。
huggingface の Tokenizer 関連を用いた Agent (dictionary, student) については、parlai/agents/hugging_face を参照されたい。
ここでは parlai/agents/hugging_face/dict.py の HuggingFaceDictionaryAgent を継承して新たなクラスを定義する(ParlAI のスクリプトには JapaneseDictionaryAgent は定義されていないので注意)。
# parlai/agents/hugging_face/dict.py
from parlai.core.dict import DictionaryAgent

class HuggingFaceDictionaryAgent(DictionaryAgent, ABC):
    def __init__(self, opt: Opt, shared=None):
        # 一部省略
        self.hf_tokenizer = self.get_tokenizer(opt)
        self.tok2ind = self.hf_tokenizer.get_vocab()
        self.ind2tok = {v: k for k, v in self.tok2ind.items()}

        self.freq = defaultdict(int)
        for tok in self.tok2ind:
            self.freq[tok] = 1         # dictionary ファイルの2列目は 1 が割り当てられる

    @abstractmethod
    def get_tokenizer(self, opt):
        pass


# 作成(例)
class JapaneseDictionaryAgent(HuggingFaceDictionaryAgent):
    def __init__(self, opt: Opt, shared=None):
        super().__init__(opt, shared)

    def get_tokenizer(self, opt):
        return BertJapaneseTokenizer.from_pretrained("cl-tohoku/bert-base-japanese-whole-word-masking")

    @property
    def add_special_tokens(self) -> bool:
        return True

    @property
    def skip_decode_special_tokens(self) -> bool:
        return True

    def override_special_tokens(self, opt):
        self.start_token = self.hf_tokenizer.pad_token
        self.end_token = self.hf_tokenizer.eos_token
        self.null_token = self.hf_tokenizer.pad_token
        self.unk_token = self.hf_tokenizer.unk_token
        self._unk_token_idx = self.hf_tokenizer.unk_token_id

        self.start_idx = self[self.start_token]
        self.end_idx = self[self.end_token]
        self.null_idx = self[self.null_token]

        self.maxtokens = self.hf_tokenizer.vocab_size
ParlAI を理解した気持ちになる
本ページでは、(自分を含む)ParlAI について日が浅い人向けに、タスクを新たに定義する場合の方針について簡単にまとめる。 実際に新たなタスクを定義する場合は、本ページの記述内容では不十分であるためドキュメントやソースコードを参照されたい。
また ParlAI に関連する記事については以下を参照されたい。
- ParlAI を理解した気持ちになる
- [ParlAI の World について (TBA)]
- ParlAI の TeacherAgent について
- [ParlAI の StudentAgent について (TBA)]
- ParlAI の dictionary (vocabulary) について - catshun’s blog
- [ParlAI を用いたモデルの学習について (TBA)]
- [ParlAI を用いたモデルのデプロイについて (TBA)]
目次
ParlAI とは?
Facebook Research が提供する、対話システムの訓練・評価、またデータ管理を行うための Python ベースで作成されたプラットフォーム。 類似するプラットフォームとして、自然言語処理では fairseq / PyText / AllenNLP 、画像処理では caffe2 / Detectron などがある。
ParlAI を使用するメリット:
- 対話システムにおける訓練・評価の枠組みが統一されている
- 多くのモデルやデータセットが公開されている
- Amazon Mechanical Turk を利用してデータ収集や評価を行うことができる [詳細]
- 学習済みのエージェントを様々なチャットサービスに接続することができる [詳細]
チュートリアルや解説記事はあるものの、モデルをカスタマイズしたい場合などにドキュメントを何度も読み返して理解する必要があるため敷居がやや高い。 日本語だと Ryobot さんの解説記事が非常に分かりやすいため、本ページを読む前にこちらを読むことをオススメしたい。
また以下のチュートリアルには、スモールサイズ (90M) の BlenderBot を動かす手順が紹介されており、こちらも合わせて参照されたい。
公開済みのデータセットとモデル
ParlAI では、雑談型対話(ChitChat)やタスク指向型対話(Goal)の他、質問応答(QA)やマルチモーダル対話(Visual)をはじめとする 18 のタスク(2022.01 時点)や関連するデータセットが用意されている。 例えば、Shuster+'20 - The Dialogue Dodecathlon: Open-Domain Knowledge and Image Grounded Conversational Agents (ACL) で使用されたデータセット(ConvAI2 / Daily Dialog / Wiz. of Wikipedia / Empathetic Dialogues / Cornell Movie / LIGHT / ELI5 / Ubuntu / Twitter / Image Chat / Image Grounded Conversations)や Blended Skill Talk / Wiz. of Internet をはじめ、質問応答に関連する SQuAD / MS MARCO / Natural Questions / HotpotQA 、また Vision-and-Language に関連する VisDial / Flickr30K / COCO Captions など多様なデータセットが提供されている。 詳細は以下を参照されたい。
さらに BlenderBot2 や Multi-Modal BlenderBot をはじめとする学習済みモデルも数多く公開されている。
ParlAI のコンセプトとエージェントの役割
ParlAI のコンセプトについては、前述した 対話モデルの訓練/評価フレームワーク ParlAI がすごい - ディープラーニングブログ に丁寧に説明されている。
ParlAI では、複数エージェントが互いにデータの受け渡しを行う。具体的には、Teacher Agent (DataLoader のような役割)が学習データを提供し、受け取ったデータを Student Agent (Model のような役割)が処理する。データの受け取りを observe()、受け取ったデータに対して行う処理を act() メソッドで定義し、これらの一連の処理を行う環境を World と呼ぶ。
Dataset
データセットの形式については一般的に以下のように定義する(自由に定義することも可能)。
- ParlAI Dialog Format
各行に対してdict(item.split(':') for item in line.split('\t'))のように読み込まれる。
# tmp/data.txt
text:hello how are you today?   labels:i'm great thanks! what are you doing?
text:i've just been biking. labels:oh nice, i haven't got on a bike in years!   episode_done:True
# 表示する際は以下のコマンドを実行する
$ parlai display_data --task fromfile:parlaiformat --fromfile_datapath tmp/data.txt
- Json Lines Format
各行が一つのエピソードとなるように定義する。
# tmp/data.json
{"dialog": [[{"id": "partner1", "text": "hello how are you today?"}, {"id": "partner2", "text": "i'm great thanks! what are you doing?"}, {"id": "partner1", "text": "i've just been bikinig."}, {"id": "partner2", "text": "oh nice, i haven't got on a bike in years!"}]]}
# 表示する際は以下のコマンドを実行する
$ parlai display_data --task jsonfile --jsonfile-datapath tmp/data.json
Teacher Agent(DataLoader)
データセットを提供するエージェントとして Teacher Agent を定義する。 なお Teacher Agent に関連するファイル構造については以下のように保存される。
- parlai/tasks/:
  - {task_name}/:
    - __init__.py:
    - agents.py:   Teacher Agent が定義される。
    - build.py:    データのダウンロードや設定が記述される。
  - task_list.py:  タスクに関するリストが記述される。新たにタスクを定義する場合は追記する。
自前のデータを使用する場合は、以下のクラスを継承して新たに Teacher クラスを定義することができる。スクラッチから作成することも可能。
parlai.core.teachers.ParlAIDialogTeacher- ParlAI Dialog Format のデータファイルをロードする場合に使用する。
parlai.core.teachers.DialogTeacher- データ形式が ParlAI Dialog Format ではない場合に使用する。データの読み込みについては柔軟に対応できる。
parlai.core.teachers.ChunkTeacher- 一度にメモリに乗り切らない大規模なデータセットを用いる場合に使用する。分割した小さなチャンクごとにデータを読み込む。
なお上記三つの Teacher クラスは、以下のメソッドを持つ parlai.core.teachers.FixedDialogTeacher(Teacher) を継承する:
reset(): 対話をリセットする。next_example(): 次の対話対を返す(終了ターンの場合は、新たなエピソードから対話対を返す)。observe(): Student Agent からモデル出力を受け取る。act(): Student Agent にデータを渡す。
# teacher.py
from parlai.core.teachers import register_teacher, DialogTeacher
from parlai.scripts.display_data import DisplayData

@register_teacher("my_teacher")
class MyTeacher(DialogTeacher):
    def __init__(self, opt, shared=None):
        opt["datafile"] = opt["datatype"].split(":")[0] + ".txt"  # {train, valid, test}.txt
        super().__init__(opt, shared)

    def setup_data(self, path):
        # 1st episode
        yield ("Hello", "Hi"), True
        yield ("How are you", "I am fine"), False
        yield ("Let's say goodbye", "Goodbye!"), False
        # 2nd episode
        yield ("Hey", "hi there"), True
        yield ("Deja vu?", "Deja vu!"), False
        yield ("Last chance", "This is it"), False

if __name__ == "__main__":
    DisplayData.main(task="my_teacher")
実際にタスクを新たに定義する場合は以下の手順で行う。
parlai/tasks/{task_name}ディレクトリ下に__init__.pyを作成。parlai/tasks/{task_name}下にデータセットをダウンロードするためのbuild.pyを作成 [詳細]。parlai/tasks/{task_name}下に Teacher Agent を記述したagents.pyを作成 [詳細]。parlai/tasks/task_list.pyに{task_name}でタスクを新たに追記 [詳細]。
Student Agent(Model)
モデルを記述するエージェントとして Student Agent を定義する。 オウム返しする Student Agent を以下に記述する。
# student.py
from parlai.core.agents import register_agent, Agent
from parlai.scripts.display_model import DisplayModel

from teacher import MyTeacher

@register_agent("parrot")
class ParrotAgent(Agent):
    def __init__(self, opt, shared=None):
        super().__init__(opt, shared)
        self.id = "ParrotAgent"

    def observe(self, observation):
        input_text = observation.get("text", "NONE")
        self.output_text = "# " + input_text

    def act(self):
        return {
            'id': self.id,
            'text': self.output_text,
        }

if __name__ == "__main__":
    DisplayModel.main(task="my_teacher", model="parrot")
Student Agent については、BERT Classifier や Seq2Seq Agent などをはじめとする多様なモデルが公開されている。
parl.ai
また以下のページでは pytorch ベースによる Encoder-Decoder の記述方法について紹介されている。 parl.ai
World
エージェント間のやりとりを行う環境として World を定義する。
from parlai.core.worlds import World

class MyWorld(World):
    def __init__(opt, agents):
        self.teacher, self.student = agents

    def parley(self):
        """
        while not world.epoch_done():
            world.parley()
        """
        inputs = self.teacher.act()
        self.student.observe(inputs)
        outputs = self.student.act()
        self.teacher.observe(outputs)
具体的にミニバッチごとにデータを受け渡す際には parlai.core.worlds.BatchWorld を使用する。
コマンドライン
ParlAI には様々なコマンドラインが用意されている。
スーパーコマンドである parlai を使用すると python parlai/scripts/*.py が実行される。
すなわち parlai display_data は python parlai/scripts/display_data.py と同義である。
# Example of CLI(一貫していないので注意)
$ parlai display_data --task babi:task1k:1
$ parlai display_model --task babi:task1k:1 --model repeat_label

$ parlai train_model --model seq2seq --task babi:Task10k:1 --model-file '/tmp/model' --batchsize 32 --learningrate 0.5
$ parlai eval_model --task "babi:Task1k:2" -m "repeat_label"
$ parlai interactive --model-file "zoo:tutorial_transformer_generator/model"
ディレクトリ構造
ParlAI の GitHub リポジトリは、以下の目的別にディレクトリが構成されている。その他については README を参照されたい:
- core: フレームワークの主要なスクリプトを含む。
- agents: hugging_face など、異なるタスクやプラットフォームを wrapper したエージェントを含む。
- scripts: 実行時の処理(build_dict, train_model, interactive など)が記載されたスクリプトを含む。
parlaiCLI を用いると、このディレクトリ下のファイルが実行される。 - tasks: データセットに関するスクリプトを含む。TeacherAgent (DataLoader) が定義される。
- zoo: モデルファイルを含む。